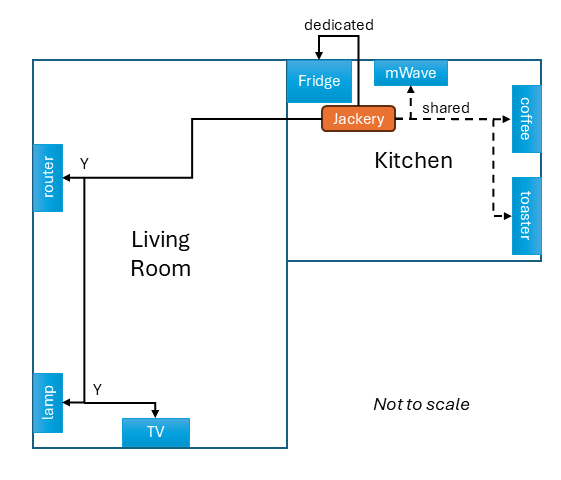
During a recent power outage (see Lab Notes: Lessons from a 24-Hour Power Outage), I got caught flat-footed. I didn’t have enough extension cords — or at least not the right ones — to power what I wanted from our Jackery, a large-capacity, battery-operated, portable power station. So I had to improvise. Afterward, I decided: never again.
My goal: customize a collection of extension cords so they are tailored to our house layout (see the schematic drawing above). When future outages come, we can:
- Park the Jackery in a consistent spot
- Attach the right cords for our setup
- Cleanly route power to the fridge, microwave, router, etc., with minimal tripping hazards
Have you got an emergency power setup you like (or are still working on)? Drop me a note — I’d love to hear how you’re planning and preparing for your next outage.
Here’s what I did:
I took an old extension cord and laid it on the floor starting at the Jackery’s planned home — near the fridge. Then, I routed it to each device I wanted to power. At each stop, I wrapped the cord with masking tape and wrote the name of the device. Then, I stretched out the cord and measured each segment (see the table below).
| Segment | Length (feet) |
|---|---|
| Jackery to router | 25 |
| Router to lamp | 10 |
| Lamp to TV | 10 |
| Jackery to fridge | 4 |
| Jackery to microwave | 8 |
| Microwave to coffee maker | 6 |
| Coffee maker to toaster | 5 |
Instead of having a separate “home run” to each device, I decided to daisy-chain some of them. At each junction, I plan to use a Y-splitter: one side powers a device (like the lamp or router), the other continues on to the next device.
The kitchen run (microwave → coffee maker → toaster) adds up to about 20 feet — but since we’ll only run one of those at a time, I just need a single 20-foot cord for the whole segment.
Shopping list:
- One 25-ft extension cord
- Two 10-ft cords
- One 20-ft cord
- One 4-ft appliance cord
- Two Y-splitters
- One timer (for the fridge — to run it 2 hours on, 4 hours off)
- Two headlamps (for moving safely in the dark)
Total cost: ~$100.
Now I believe we’re ready — not just with more cords, but with smarter ones.
